Loan Performer can produce Monthly Monitoring Reports for each loan fund used. These reports compare targets against achievements and are produced automatically, however you need to set the targets that your organization aims to achieve.
How to set Targets
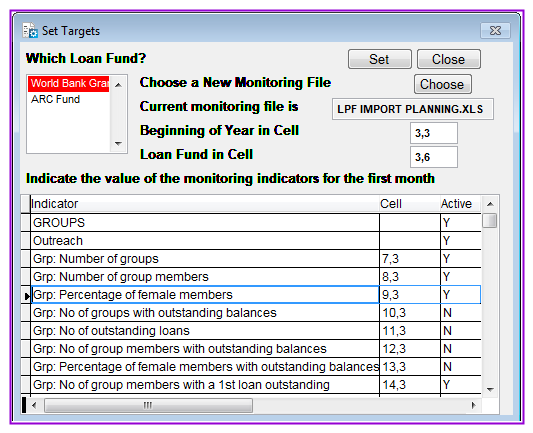
To set targets you go to System->Set Targets and a screen that looks as follows will appear:
A pop up screen will appear that looks as follows:
The path to this file is C:\LPF814, (This path may change depending on where LPF has been installed)
Select the LPF Import Planning.xls file as seen above.
This file contains references to a Branch Planning Model – also a spreadsheet file – that produces monitoring indicators according to certain assumptions.
Indicate the value of the monitoring indicators for the first month: There are various indicators displayed in the list box. For every indicator the references have to be specified.
There are three columns showing: Indicator (I.e. Monitoring area), Cell (i.e. the exact position at which the indicator is located) and the last column Active shows the status of the indicator whereby T stands for True and F stands for False (i.e. active and inactive).
*In case reporting is to be done for a given indicator, then enter T to make it active otherwise if reporting will not be done on this indicator enter “F” to make it in-active.
*When all the necessary settings have been done, click the Set button to have the targets imported. A pop up information window will appear which looks as follows:
Click Yes button to continue.
A new information screen appears that looks as follows:
Excel will detect automatic links to information in another workbook and ask you if you want to update the current workbook with changes made to the other workbook. This is not necessary if you didn't change anything or if the other workbook is not available.
Click on the No button to continue.
Another pop up information screen will appear as seen below.
Click the Yes button to continue.
LPF will import the targets and in case of any differences, a pop up information window will appear showing some differences that may have been found. The pop up information window looks as follows:
Click Yes button in order to view the differences. You will have a pop up screen that looks as follows;
Take note of the differences and press the Esc key on your keyboard or close the screen.
A new Information window will appear that looks as follows;
In order to make changes in the import planning template, click No which will automatically terminate Setting Targets of which you go back to the import planning template to make the changes in the areas where differences were arising.
Otherwise if you feel you do not need to make changes in the indicators with differences; click Yes button to continue.
This will then import the indicators after which a message will be got reading “Operation successful. Just a moment please, closing files…”
The targets will have been set for the fund selected. In the example in the first screen, the targets set will be for Adrian Loan Fund.
Go through the same process for all the funds which need monitoring.
***Please read part B of this page to know how to use the import planning template.***
B) Use of the Import planning.xls variables
i) Go to the working folder of LPF (i.e. where Loan Performer was installed) and double click on import planning.xls. A pop up information screen will appear along with the indicators template.
Click Yes button so as to update the Import Planning template (spreadsheet). The Import Planning template in part will look as follows:
In the template above, you can make some changes like the name of the organisation to your organisation’s name, Monitoring period, figures and Fund.
In case you have more than one fund then you have to create more than one template.
Note that the “Branch Planning Model” is not part of Loan Performer and should be created by the branch/organisation itself. You only have to take care that the links in the “LPF Import Planning” file refer to the right cells in the “Branch Planning Model”.
In case you rename the “Branch Planning Model” file, you should open the LPF Import Planning file, choose Edit in the Excel menu, choose Links, and choose Change Source and Update Now.
For every year and for every fund a new “Branch Planning Model” file has to be created and imported into Loan Performer via the “LPF Import Planning” file. The “LPF Import Planning” has a year and a fund indication. By default the cell C3 indicates the start of the monitoring year and cell F3 indicates the fund code that Loan Performer uses to identify the loan revolving fund. Cell C3 has a custom format of “dd/mm/yy” and cell F3 has no specific format but fund codes are entered as numbers. The place of these cells can be changed, but it’s better not to touch the format of the LPF Import Planning file.
Any insertion/deletion of rows or columns in the LPF Import Planning file can create problems when importing data. You only have the option to deactivate indicators from within LPF. If you want additional indicators or change the way they are calculated, you will have to contact Crystal Clear Software Ltd.
When importing, LPF doesn’t override targets that were included in the printout of past monitoring reports. The program keeps track of the last monitoring report printed and updates only the targets from the months thereafter.
It is however possible to reprint the monitoring sheet for past months again. To prevent inconsistencies, the monitoring sheets, once calculated and saved to disk, cannot be calculated again. This is done this way, because operations like rescheduling and refinancing might change indicators of past months (like “Amounts Due” and “Amounts Disbursed”).
The importation of data from the spreadsheet into the LPF table is possible taking into account the following remarks:
1. Modifications of the data in the Branch Planning Model are not automatically reflected in the “Monthly Monitoring Reports” produced by Loan Performer. Before running any Monthly Monitoring Reports, the user has to be sure that no modifications have taken place in the targets of the “Branch Planning Model”. Otherwise the “Set Targets” option should be run again.
2. For each monitoring-year there will be another “Branch Planning Model” and LPF Import Planning file. The start of the monitoring year should be indicated in cell C3 of the LPF Import Planning file, in the form of a date field. LPF checks if the date of the next monthly monitoring report falls in the year that is indicated in the “LPF Import Planning” file. If this is not the case, you cannot continue with the importation. If reports have been printed for all months, Loan Performer will create a new file to store targets and achievements. The file for last year will be destroyed and any printouts needed for past months should be made before incorporating the targets for a new year.
3. If there are different funds, there will be separate planning and monitoring files, one for every fund. The name of each file where Loan Performer stores targets and achievements is Monitor plus the fund-code of the revolving fund (see “System/Configuration/Funds” where the fund-code is a read-only field). The same code should be inserted in cell F3 of the monitoring spreadsheet (as a value, not as a text string). If those two indicators for the loan fund don’t match, you cannot set targets for this fund.
4. The place of the file should be the same on any computer (in the LPF folder),
The structure of the monitoring sheet may not change. You cannot add/delete rows or columns.
5. Any change in the type of indicators brings a need to adjust the Loan Performer application. Only Crystal Clear Software Ltd. can do this. If the name of an indicator that Loan Performer expects, does not exactly match with the name in the “LPF Import Planning” file, an error message is displayed. You will have the choice to cancel the data transfer or to continue, accepting that there is a difference between the 2 labels (the labels are displayed on screen).
6. The indicator 'Number of branch staff' on the System->Configuration->General window is used in the monitoring sheet to calculate the number and the amount of loans disbursed per staff.
The Nº 1 Software for Microfinance